Simple API Key authentication in Spring Boot 3.1
A quick guide to API key protection in Spring Security 6

Software engineer, backend developer, computational modeling researcher, and enthusiast in the field of digital electronics and robotics.
Introduction
I recently wrote a Spring Boot 3 application that needed basic protection for some endpoints accessed internally. I initially had some trouble setting up the web security configuration, since Spring Security 6 has deprecated most of what I was used to doing in previous versions. For example, the well-known WebSecurityConfigurerAdapter class has been removed and now you should provide a SecurityFilterChain bean instead.
During the process, I noticed most of the relevant online tutorials are still using the old stuff, so I decided to provide a quick tutorial to guide you through this simple security use case the new way.
Demo project
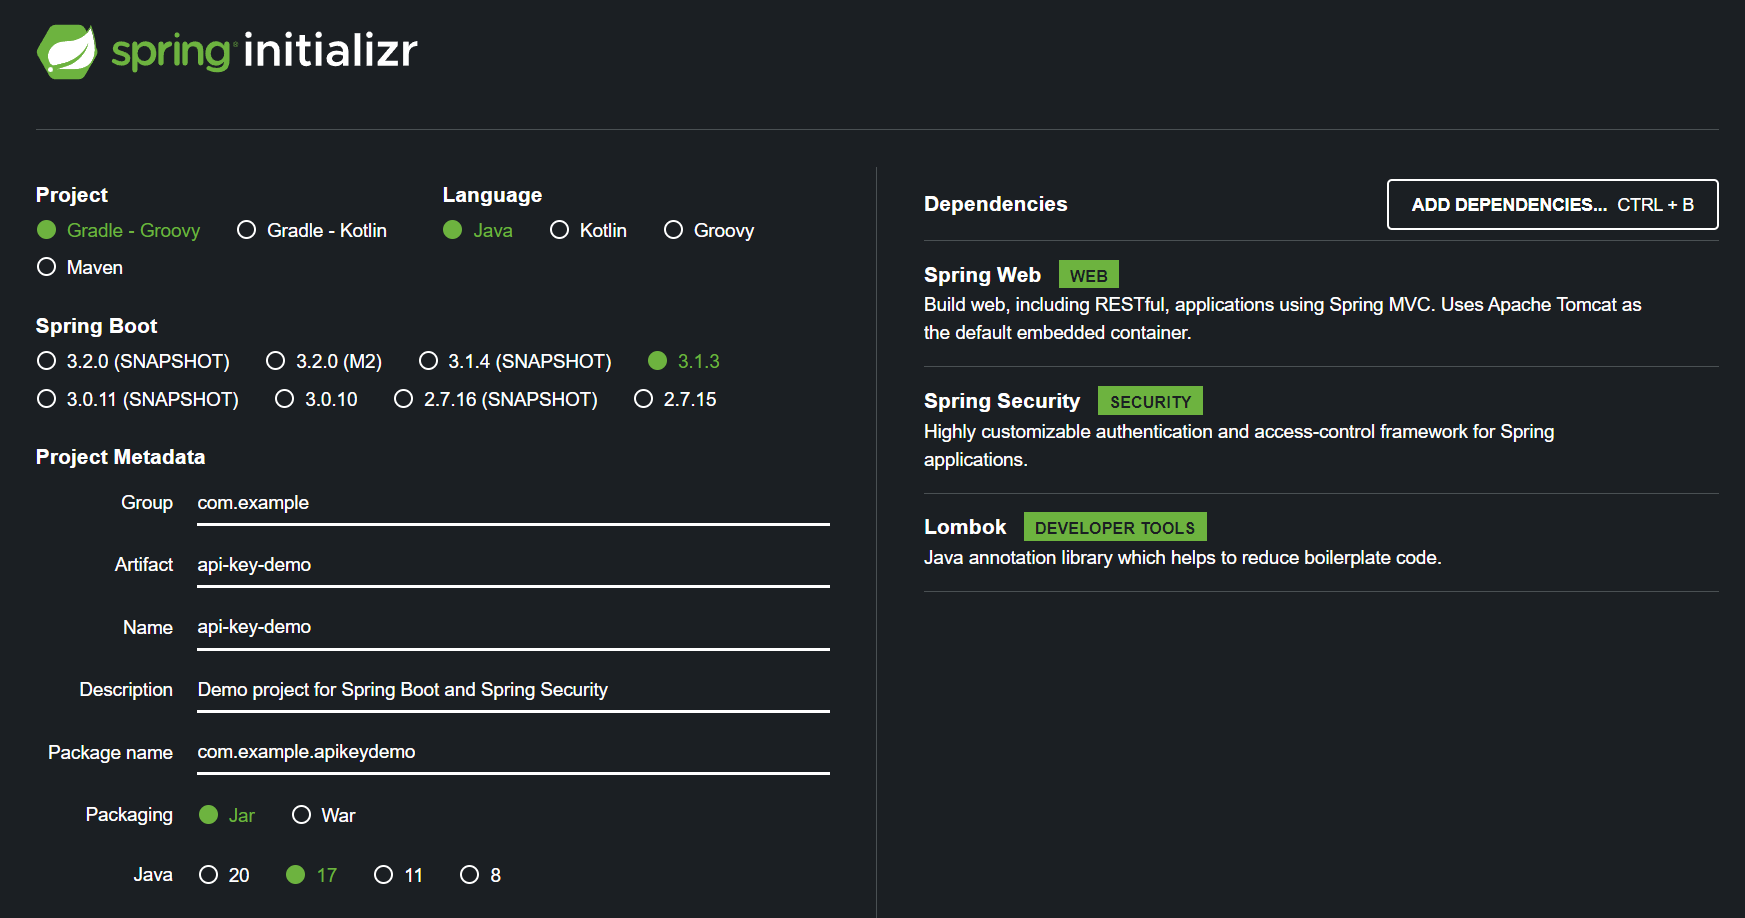
Let's get started by creating a new project using the Spring Initializr:
Once you set the project up in your favorite IDE, create a simple controller class with two simple endpoints:
package com.example.apikeydemo.controller;

// Imports
...
@RestController
public class GreetingsController {

    @GetMapping("/public/greetings")
    public ResponseEntity<String> getPublicGreetings() {
        return ResponseEntity.ok("Greetings from a public endpoint!");
    }

    @GetMapping("/protected/greetings")
    public ResponseEntity<String> getProtectedGreetings() {
        return ResponseEntity.ok("Greetings from a protected endpoint!");
    }

}
Now let's create a configuration for web security by providing a SecurityFilterChain bean to define that every endpoint with the pattern /public/** should be public and require no authentication. We must set the session management policy to STATELESS and disable the form login authentication. For the sake of simplicity, we are also disabling CORS and CSRF.
package com.example.apikeydemo.security;

// Imports
...
@Configuration
@EnableWebSecurity
public class SecurityConfiguration {

    @Bean
    public SecurityFilterChain securityFilterChain(HttpSecurity http) throws Exception {
        return http
                .cors(AbstractHttpConfigurer::disable)
                .csrf(AbstractHttpConfigurer::disable)
                .sessionManagement(sess -> sess.sessionCreationPolicy(SessionCreationPolicy.STATELESS))
                .formLogin(AbstractHttpConfigurer::disable)
                .securityMatcher("/**")
                .authorizeHttpRequests(registry -> registry
                        .requestMatchers( AntPathRequestMatcher.antMatcher("/public/**") ).permitAll()
                        .anyRequest().authenticated()
                )
                .build();
    }

}
The authorizeHttpRequests method is used to register specific security policies to corresponding request matchers. In our case, we are permitting every request to any path matching the /public/** pattern and requiring authentication for everything else.
If you run the application, you should have no trouble accessing the http://localhost:8080/public/greetings endpoint via the GET method. On the other hand, there is no way to access the protected endpoint http://localhost:8080/protected/greetings just yet. To do that, we must set an authentication filter accepting a predefined API key from the HTTP header. Let's then create our ApiKeyAuthFilter class:
package com.example.apikeydemo.security;

// imports
...
import java.io.IOException;

@Component
@RequiredArgsConstructor
public class ApiKeyAuthFilter extends OncePerRequestFilter {

    private final ApiKeyAuthExtractor extractor;

    @Override
    protected void doFilterInternal(HttpServletRequest request, HttpServletResponse response, FilterChain filterChain) throws ServletException, IOException {
        extractor.extract(request)
                .ifPresent(SecurityContextHolder.getContext()::setAuthentication);

        filterChain.doFilter(request, response);
    }
}
We must also implement a component for extracting the authentication from the request headers:
package com.example.apikeydemo.security;

// imports
...
@Component
public class ApiKeyAuthExtractor {

    @Value("${application.security.api-key}")
    private String apiKey;

    public Optional<Authentication> extract(HttpServletRequest request) {
        String providedKey = request.getHeader("ApiKey");
        if (providedKey == null || !providedKey.equals(apiKey))
            return Optional.empty();

        return Optional.of(new ApiKeyAuth(providedKey, AuthorityUtils.NO_AUTHORITIES));
    }

}
The extract method above looks for an entry in the request header identified by ApiKey, which must contain the value of the expected key. The expected key is defined in the application.properties file located under the resources folder.
It's advisable not to store your application key directly within a properties file, especially if that file is included in your project repository. A more secure practice is to utilize environment variables, which allow the key to be supplied to the application externally. So your application.properties file should look like this:
# API key is passed through environment variable API_KEY
application.security.api-key=${API_KEY}
Now let's implement the ApiKeyAuth class, which extends from AbstractAuthenticationToken:
package com.example.apikeydemo.security;

// imports
...
public class ApiKeyAuth extends AbstractAuthenticationToken {

    private final String apiKey;

    public ApiKeyAuth(String apiKey, Collection<? extends GrantedAuthority> authorities) {
        super(authorities);
        this.apiKey = apiKey;
        setAuthenticated(true);
    }

    @Override
    public Object getCredentials() {
        return null;
    }

    @Override
    public Object getPrincipal() {
        return apiKey;
    }

}
The key extractor component will create an object of the class ApiKeyAuth when a correct API key is found in the request header. The instance is then handed over to the security context by the authentication filter component. To proceed, we'll inject the authentication filter into the security configuration component and employ it to manage access to protected endpoints:
package com.example.apikeydemo.security;

// Imports
...
@Configuration
@EnableWebSecurity
@RequiredArgsConstructor
public class SecurityConfiguration {

    private final ApiKeyAuthFilter authFilter;

    @Bean
    public SecurityFilterChain securityFilterChain(HttpSecurity http) throws Exception {
        return http
                .cors(AbstractHttpConfigurer::disable)
                .csrf(AbstractHttpConfigurer::disable)
                .sessionManagement(sess -> sess.sessionCreationPolicy(SessionCreationPolicy.STATELESS))
                .formLogin(AbstractHttpConfigurer::disable)
                .securityMatcher("/**")
                .authorizeHttpRequests(registry -> registry
                        .requestMatchers( AntPathRequestMatcher.antMatcher("/public/**") ).permitAll()
                        .anyRequest().authenticated()
                )
                .addFilterBefore(authFilter, UsernamePasswordAuthenticationFilter.class)
                .build();
    }

}
Running the application
In order to verify if the implemented protection rules are working as intended, let's define an environment variable containing the dummy API key myapikey and start the application. You can do both things at once in a Unix environment by running the command:
API_KEY=myapikey gradle bootRun
Now if you provide the key via a proper header entry in your request, you should be able to retrieve the information provided by the protected endpoint /protected/greetings:

Testing with MockMVC
Before wrapping this one up, let's implement a few integration tests using MockMVC to verify the security of our application. First, let's write a test for our public greetings endpoint:
package com.example.apikeydemo.controller;

// Imports
...
@SpringBootTest
@AutoConfigureMockMvc
class GreetingsControllerTest {

    @Autowired
    private MockMvc mockMvc;

    @Test
    void shouldGetPublicGreetings() throws Exception {
        this.mockMvc.perform(get("/public/greetings"))
                .andExpect(status().isOk())
                .andExpect(content().string(containsString("Greetings")));
    }
    ...
This simple test verifies if the server responds with the status code of success (200) and if the response body contains the "Greetings" string. We are also going to add both verifications to the protected endpoint test, but this time we need to provide a header entry containing the application key. Don't forget to create a properties file under the src/test/resources folder of your project containing a dummy key for testing.
...
@Value("${application.security.api-key}")
private String apiKey;

@Test
void shouldGetProtectedGreetings() throws Exception {
    this.mockMvc.perform(get("/protected/greetings").header("ApiKey", apiKey))
            .andExpect(status().isOk())
            .andExpect(content().string(containsString("Greetings")));
}
...
Now we must write tests to ensure that the application returns the status code of 401 (Unauthorized) if the client provides an invalid key or even no key at all:
...
    @Test
    void shouldReturnError_IfWrongApiKeyIsProvided_WhenAccessingProtectedGreetings() throws Exception {
        this.mockMvc.perform(get("/protected/greetings").header("ApiKey", "mywrongkey"))
                .andExpect(status().isUnauthorized());
    }

    @Test
    void shouldReturnError_IfNoApiKeyIsProvided_WhenAccessingProtectedGreetings() throws Exception {
        this.mockMvc.perform(get("/protected/greetings"))
                .andExpect(status().isUnauthorized());
    }
} // End of GreetingsControllerTest class
Handling authentication exceptions
If you have followed all the steps of this tutorial so far, you'll notice that both the two last tests will fail. That's because Spring Security will return a status code of 403 (Forbidden) by default if no valid authentication is provided to the security context when accessing protected endpoints. However, the 403 status may not provide the most accurate representation of the issue, as it could imply that the client is authenticated but lacks the necessary permissions.
To work around this issue, we must provide an exception handler to the security filter chain that is responsible for sending the status code 401 to the client if any error occurs at the authentication entry point:
// UnauthorizedHandler.java
package com.example.apikeydemo.security;
...
@Component
public class UnauthorizedHandler implements AuthenticationEntryPoint {
    @Override
    public void commence(HttpServletRequest request, HttpServletResponse response, AuthenticationException authException) throws IOException {
        response.sendError(HttpServletResponse.SC_UNAUTHORIZED, authException.getMessage());
    }
}

// SecurityConfiguration.java
package com.example.apikeydemo.security;
...
@Configuration
@EnableWebSecurity
@RequiredArgsConstructor
public class SecurityConfiguration {

    private final ApiKeyAuthFilter authFilter;
    private final UnauthorizedHandler unauthorizedHandler;

    @Bean
    public SecurityFilterChain securityFilterChain(HttpSecurity http) throws Exception {
        return http
                .cors(AbstractHttpConfigurer::disable)
                .csrf(AbstractHttpConfigurer::disable)
                .sessionManagement(sess -> sess.sessionCreationPolicy(SessionCreationPolicy.STATELESS))
                .formLogin(AbstractHttpConfigurer::disable)
                .exceptionHandling(configurer -> configurer.authenticationEntryPoint(unauthorizedHandler))
                .securityMatcher("/**")
                .authorizeHttpRequests(registry -> registry
                        .requestMatchers( AntPathRequestMatcher.antMatcher("/public/**") ).permitAll()
                        .anyRequest().authenticated()
                )
                .addFilterBefore(authFilter, UsernamePasswordAuthenticationFilter.class)
                .build();
    }

}
All tests should now pass without any issues.
Conclusion
This article has explored the process of implementing simple API key authentication in a Spring Boot 3.1 application, navigating the changes introduced in Spring Security 6. This type of authentication is well-suited for scenarios with relatively low-security requirements, such as internal endpoints or public data services without sensitive information. We have also discussed a bit about integration tests, ensuring the correctness of our security measures and highlighting the importance of proper error handling to provide clear feedback to the clients.


